
The ‘Duplicate, Google Chose Different Canonical than User’ error can significantly impact your website’s search performance. This error occurs when Google identifies duplicate pages but does not choose your preferred URL as the canonical version.
Fixing this issue ensures that search engines recognize the correct version of your content, improving your site’s visibility and ranking. This guide will help you understand and resolve this error, making your site more search engine friendly.
Understanding the Error
The ‘Duplicate, Google Chose Different Canonical than User’ error indicates that Google has found multiple versions of a page and has chosen a different canonical URL than the one you specified.
Canonical URLs tell search engines which version of a page should be indexed and shown in search results. Without proper canonicalization, search engines might index the wrong version, leading to duplicate content issues and potentially harming your site’s SEO.
By understanding this error, you can take steps to ensure your preferred URL is correctly recognized by search engines.
Identifying the Issue
To identify this error in Google Search Console:
- Log in to your account.
- Navigate to the Indexing tab, click on Pages.
- Look for the ‘Duplicate, Google Chose Different Canonical than User’ error.
- Click on this error to display a list of affected URLs.
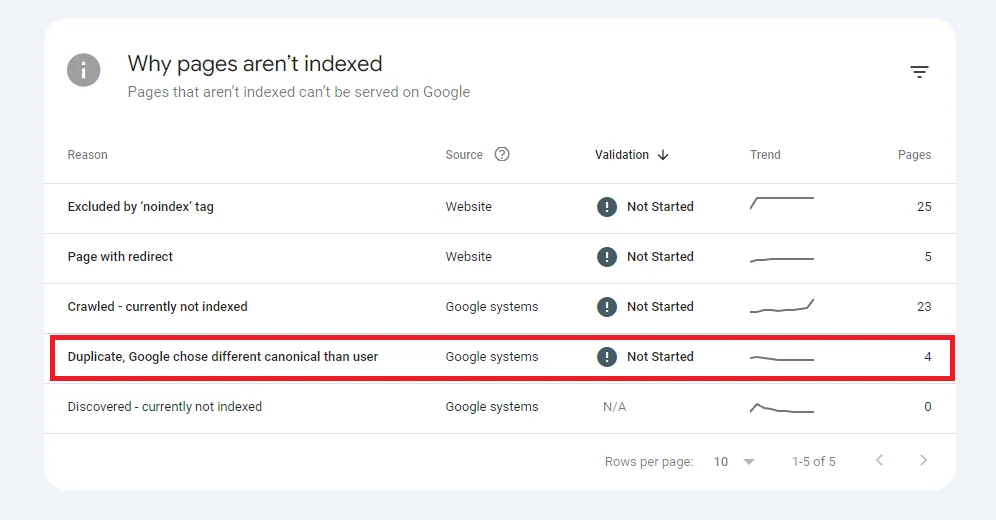
Examining these URLs will help you pinpoint the exact pages that need attention and provide a clear starting point for reviewing and correcting your canonical tags and other related issues.
Analyzing the Duplicate URLs
Once you have identified the affected URLs, the next step is to analyze why these duplicates exist. Use the URL Inspection Tool in Google Search Console to inspect each affected URL.
This tool provides detailed information about how Google views your pages. Check the ‘Inspect URL’ report to see which URL Google has selected as the canonical. Compare the content of the affected pages to ensure they are not significantly different.
Also, review your internal linking structure to ensure links consistently point to your preferred canonical URLs. Consider external factors like backlinks, as they can influence which URL Google selects as canonical.
Reviewing Canonical Tags
Canonical tags play a crucial role in guiding search engines to the correct version of a page. To review your canonical tags, open the affected page in your browser, right-click, and select “View Page Source” or press Ctrl+U. Look for the <link rel=”canonical” href=”URL”/> tag in the HTML source code.
Verify that this tag points to your preferred URL. Ensure all similar pages have consistent canonical tags pointing to the same URL. If the canonical tag is missing or incorrect, update the HTML source code to include the correct tag.
This step is vital to ensure that search engines recognize the correct version of your content.
Fixing Canonical Tags
To fix the canonical tags on your pages, follow these detailed steps:
- Update HTML Source Code: Open the HTML source code of the affected pages. Locate the <link rel=”canonical” href=”URL”/> tag. Ensure this tag points to your preferred URL. If the tag is incorrect or missing, add or correct it to reflect the right URL. Save the changes and upload the updated HTML files to your server.
- Ensure Consistency Across Similar Pages: Review all pages that are similar or related. Check that each of these pages has a canonical tag pointing to the same preferred URL. Consistency helps search engines understand which version to prioritize, avoiding further confusion.
- Configure CMS for Automatic Canonical Tags: If you are using a Content Management System (CMS) like WordPress, Joomla, or Drupal, check if it can automatically generate canonical tags. Most modern CMS platforms have this feature built-in or offer plugins to manage it. Ensure your CMS is configured correctly to handle canonical tags on all pages.
- Check for a Single Canonical Tag Per Page: Ensure that each page has only one canonical tag. Multiple canonical tags can send conflicting signals to search engines, causing indexing issues. Open the HTML source of each page and verify that only one canonical tag is present.
- Review and Correct Redirects: Check any redirects that might be in place. Redirects should point to the preferred canonical URL to maintain consistency. Use tools like Screaming Frog or your server’s configuration files (e.g., .htaccess for Apache servers) to review and correct redirects as necessary. For more detailed guidance on handling redirects, see our comprehensive guide on how to fix page redirects.
By following these steps, you can ensure that your canonical tags are correctly set, helping search engines to index the correct version of your pages.
Updating Sitemaps
An accurate sitemap is crucial for helping search engines understand your site’s structure. Generate a new XML sitemap that includes the correct URLs. Once created, go to the Sitemaps section in Google Search Console, enter the new sitemap URL, and click “Submit.”
This helps Google re-crawl your site with the updated information. Review the sitemap to ensure there are no errors or incorrect URLs. Additionally, check your robots.txt file to make sure it does not block access to important pages or the sitemap itself.
Keeping your sitemap up-to-date ensures that search engines have the latest information about your site’s structure.
Testing and Validation
After updating your canonical tags and sitemap, it is essential to test and validate your changes. Use the URL Inspection Tool in Google Search Console to check the updated URLs.
Enter each URL to see if the error persists. If the issue appears to be resolved, request indexing for the updated pages. This prompts Google to re-crawl these pages and update its index.
Review the Page Indexing tab again to confirm that the ‘Duplicate, Google Chose Different Canonical than User’ error has been fixed for the affected pages. Ensure that the content on the updated pages is consistent and does not introduce new duplication issues.
Monitoring for Recurrence
To prevent the ‘Duplicate, Google Chose Different Canonical than User’ error from recurring, regular monitoring is essential. Frequently check the Page Indexing tab in Google Search Console for new issues.
Set up email alerts to notify you of any new errors. Periodically review your canonical tags and sitemaps to ensure they remain accurate.
Additionally, monitor your backlink profile using tools like Ahrefs or Moz to ensure that external links continue to point to your preferred canonical URLs. Proactive monitoring and maintenance help keep your site optimized and free from duplicate content issues.
Conclusion
By following these steps, you can resolve the ‘Duplicate, Google Chose Different Canonical than User’ error and improve your website’s search performance. Regular monitoring and maintenance are crucial to keeping your site healthy and SEO-friendly.
Implementing these practices ensures that your website remains optimized and free from duplicate content issues, providing a better experience for both users and search engines.
If you need assistance with fixing and monitoring these issues, consider subscribing to our monthly SEO plan. Our experts will help ensure your site stays optimized and free of errors.